Shoulder Surgery

Arthroscopic (Keyhole) Rotator Cuff Repair

Arthroscopic Rotator Cuff Repair

Arthroscopic Rotator Cuff Repair is a minimally invasive keyhole procedure to repair rotator cuff tendon tears. It is often done as a part of other keyhole procedures in the shoulder, such as a subacromial decompression and acromioplasty, biceps tenodesis, and AC joint excision.

Surgery generally involves an overnight stay with a sling required for 6 weeks after surgery. Therapy using the JPL protocol commences 2 weeks after surgery and strengthening is allowed at 3 months. When all of the pain generators in the shoulder are treated, it is a successful operation and restores function and quality of life.

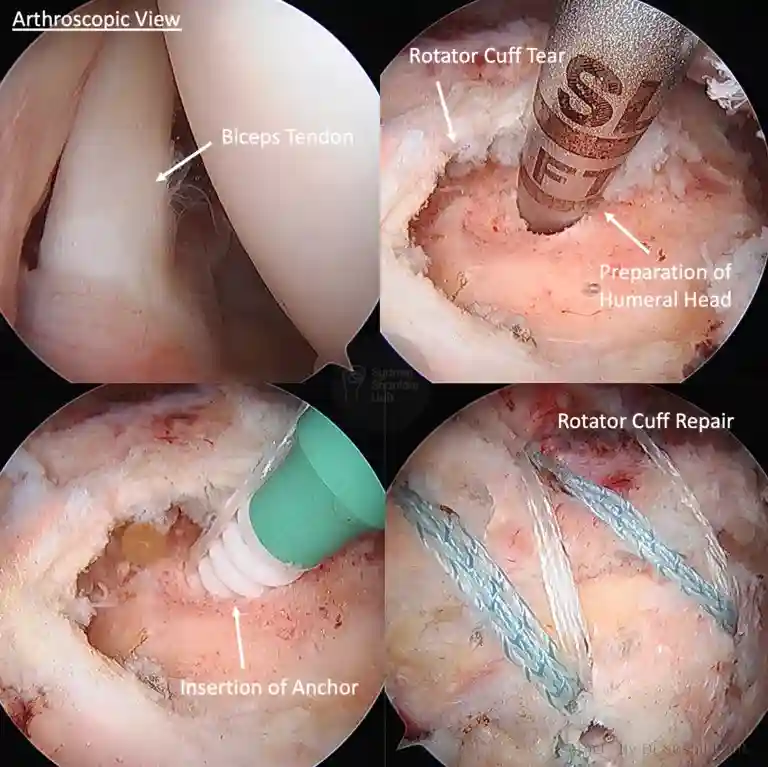
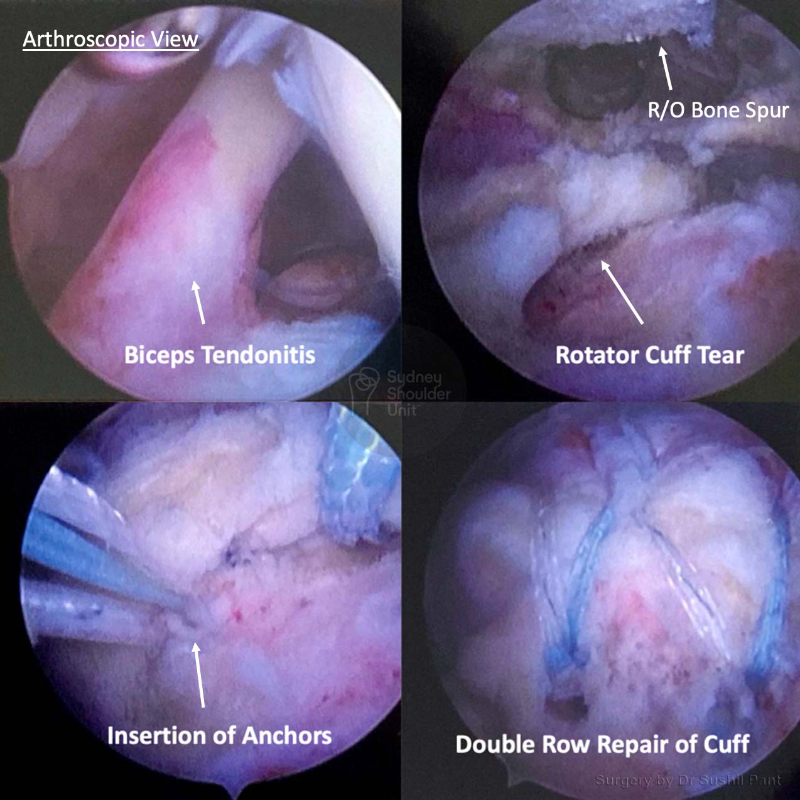
The principle of arthroscopic rotator cuff surgery is to reattach the torn tendon back to the humerus (ball) and address any other areas of concern at the same time – biceps tendon, shoulder spur, bursitis, acromioclavicular joint, and shoulder joint capsule. The procedure is almost always carried arthroscopically (keyhole) and involves an overnight stay in hospital. Patients are in a sling for six weeks and start rehabilitation using the JPL protocol at two weeks post-surgery.

2 medical diagrams showing the 3 stages involved in an Arthroscopic Rotator Cuff Repair

The main area of concern is the torn rotator cuff (supraspinatus tendon tear is the most common); the following areas are also addressed if needed:

  • Biceps tendonitis
  • Acromioclavicular joint (AC Joint) arthritis
  • Subacromial bursitis
  • Subacromial spur (Shoulder spur)
  • Shoulder joint capsulitis
  • Glenoid labrum tear (anterior and/or posterior labrum)

The decision to address these areas is best made in the office during your consultation – this is based on a careful history, physical examination, imaging review (MRI), and discussion with the patient about their expectations and functional requirements. In a small number of cases, unexpected findings are made at surgery and Dr Pant will undertake the treatment that provides you with the best outcome.

The procedure is performed under a General Anaesthetic where you will be positioned on your side and the affected arm secured in a special arm holder.

  • Small key-hole incisions (about 0.5-1cm) are made and the camera and surgical instruments are placed inside the shoulder.  Usually 4-6 incisions are enough to carefully repair the shoulder
  • A thorough 15-point examination of the shoulder joint is made via the arthroscopic camera and pictures are taken to document findings.

Biceps 

  • The first step is to address the biceps tendon if needed
  • The biceps tendon will either be moved out of the shoulder joint or re-anchored in the armpit at the start of the case
  • The decision between these two options is made in the office and will be on your consent form prior to surgery.

Bone Spur and Bursa 

  • Next, attention is turned to the area above the tendon and any bursitis is shaved away carefully and the bone spur is identified.
  • A special 5.5mm metallic burr is then used to shave away the spur and create more room to allow the tendon to move freely.

Rotator Cuff Tear

  • If there is a tear (as identified on the MRI pre-surgery) then it is carefully assessed and cleaned up. The tear is mobilised to allow for a tension-free repair and the Humerus (ball) is prepared to accept the anchor.
  • Suture anchors are then placed into the Humerus (ball of the shoulder joint) and sutures are passed through the tendon and repaired to bone (as seen in the picture below)
  • There are many special techniques to obtain a good repair and your shoulder surgeon is well versed in this.
  • Occasionally a min-open approach is used to repair the torn tendon (5cm incision)

AC Joint Resection

  • If this joint was identified as a pain generator during your examination, then about 6mm of bone from the end of the collar bone and 2mmm of bone from the end of the acromion (roof of the shoulder) is removed with a metallic burr (all key-hole) as the last step of the operation.
  • All of the wounds are then closed and dressings applied. Your arm will be placed in a sling.
  • Dr Pant will then organise close follow up at regular intervals and liaise with your Physiotherapist to maximise your recovery

A series of 4 images showing how a rotator cuff repair is performed

Medical diagram showing where the biceps tendon is released and re-anchored during a biceps tenodesis surgery

General Shoulder Surgery Risks

Surgery is a carefully choreographed process and you are being treated by a sub-specialist shoulder surgeon and a highly experienced team; however, all surgeries inherently carry some risk of complications, such as (all are below 1%). General risks include:

  • Infection
  • Nerve injury
  • Bleeding

Specific Shoulder Surgery Risks

Frozen Shoulder

  • Frozen shoulder occurs when the shoulder joint capsule becomes inflamed, red and scarred – it initially presents with severe pain, then progresses to stiffness and thaws out over many months
  • After routine shoulder surgery, the risk of frozen shoulder is 5%
  • There is nothing you or your surgeon can do to reduce this risk
  • This risk is 10% if you have a history of Diabetes or Thyroid disorders.

Frozen shoulder progresses through three phases (which may each last 2-3 months)

  • PHASE 1: Painful (even at rest and at night)
  • PHASE 2: Stiff (reduction in movement)
  • PHASE 3: Thawing out (increase in movement)

Individuals with a natural history of frozen shoulder

  • Physiotherapy is not generally helpful in the first TWO PHASES of frozen shoulder
  • Once your shoulder starts to thaw out then you can work with your therapist within the arc of movement

Outcomes after frozen shoulder

  • Although it is a nuisance, a frozen shoulder will NOT change your outcome overall after surgery
  • In fact, in some cases, it is actually protective of your surgical repair
  • Occasionally patients need a second operation to “release” the frozen shoulder key-hole. This surgery is uncommon.

Reoperation and failure of surgery

When performing a shoulder reconstruction, your surgeon is using your own tissue to repair what is damaged. The weakest point in the repair is your own tissue. The longer the history of damage and frequency of trauma prior to surgery, the more likely the tissue quality is poor. Other factors like Smoking and Diabetes may also reduce your tissue quality.

There are three areas where your shoulder reconstruction may fail:

Bone-Anchor interface

  • The anchors today are very high in quality and usually do not fail; sometimes if your bone is soft (older patients), the anchor may pull out of the bone.

Anchor-Suture interface

  • This area is typically very strong and not a source of common failure

Suture-Tissue interface

  • This is the weakest point and the most common reason for failure of surgery (usually due to poor tissue quality)
  • There are special techniques in tissue management and suture choice to reduce failure rates.

Re-tear of the rotator cuff tendon repair

  • This will generally range from 5-20%
  • The larger your tear the more likely you are to have a re-tear of your tendon

Failure of Biceps Tenodesis (Re-anchoring of the tendon)

  • This is reported at between 2-6% (but in the SSU experience it is < 1%)

There are three essential components to a good outcome from surgery:

  • Your surgeon
  • You as a patient
  • Your physiotherapist.

Post-operative physiotherapy

Dr Pant utilises the JPL pathway for most patients and this will form the basis of your rehabilitation after surgery; it will be modified to suit your individual circumstance.

The JPL pathway allows for self-directed, early passive shoulder range of movement:

  • Passive = assisted with your other arm
  • Active = you move the affected arm independently

Therapy overview 

After the surgery you will be in a sling and protect your shoulder to allow the rotator cuff repair to heal. At two weeks after the surgery, Dr Pant will see you at your review appointment and discuss the JPL rehabilitation protocol with you. This JPL physiotherapy protocol will commence two weeks after your surgery.

The therapy program will focus on flexibility and range of motion exercises initially. These gentle stretches will improve your range of motion and prevent shoulder stiffness. As the rotator cuff repair begins to heal you will be able to progress to exercises that strengthen your shoulder muscles. Shoulder strengthening is commenced at 12 weeks post rotator cuff repair surgery.

Sling

A sling is required for the first 6 weeks after your surgery; the sling is worn for a further 6 weeks outside of the house (to remind others you have had shoulder surgery). In some instances you may only need a sling for 1-2 weeks – Dr Pant will discuss these cases with you.

The type of sling is selected specific to you and your shoulder surgery:

  • Normal sling – Subacromial Decompression + Biceps tenotomy/tenodesis + AC Joint Resection
  • Abduction sling – Rotator Cuff repair (with a kidney-shaped wedge on your flank)

Cropped image of 2 women showing the normal sling and abduction sling which may be used following arthroscopic rotator cuff repair surgery

Driving after shoulder surgery

  • After shoulder surgery, you will be in a sling and you may be unable to drive for at least 6 weeks
  • This does vary depending on the complexity of your surgery and the patient. Some patients may be able to drive at 2-4 weeks; and some may not be able to drive for the full 12 weeks. This will be individualised to your situation.

Showering and getting dressed

  • You may take the sling off to shower
  • Lean forward and allow your arm to “dangle” to wash under your arms
  • The dressings applied are waterproof and you may shower with them on
  • Usually, before you are discharged from Hospital, your dressings are changed after your morning shower.
  • These “new” dressings are then kept intact until your review at 10-14 days
  • If the dressings start to peel at the edges – you may reinforce them
  • If the dressings discolour with discharge (yellow or green) you may have a wound infection; do not be alarmed just yet – please notify SSU (02 9215 6100 or admin@drpant.com.au) and we will give you a plan.
  • When getting dressed, you may use your good arm to move your affected (operated arm) to place your arms through the sleeves carefully

Sleeping after Shoulder Surgery

  • Most patients find it difficult to lie flat after shoulder surgery.
  • Consider using a few pillows to prop yourself up and sleep at a slight incline; this may be necessary for 4-6 weeks after surgery. You should keep your sling on while asleep.

Elbow and hand movement

  • Keep your elbow and hands joints moving and supple for the duration of time you are in the sling. The best time to move your elbow (into full extension and flexion) is when you are in the shower, just out of the shower and about to get dressed.

The way to achieve the best outcome after rotator cuff surgery starts with an accurate diagnosis, through patient education, excellent surgical technique, adequate post-surgery pain relief, careful rehabilitation and collaboration with your physiotherapist.

The outcome after rotator cuff repair is generally excellent with the resolution of symptoms and restoration of function. It is not possible, however, to restore the shoulder back to “normal” as your surgeon is using your own tissue to repair what is torn.

There are many factors that contribute to a successful outcome after rotator cuff repair:

  • Nature of tear (acute tears do better than chronic/degenerative tears)
  • Treatment of associated conditions that may be pain generators (such as the biceps tendon or acromioclavicular joint arthritis)
  • General health of the patient
  • Quality of the remaining tendon
  • Post-surgery compliance with sling use and post-operative protocol
  • Physiotherapy

It is important to remember that when performing a rotator cuff repair your surgeon is using your own tissue to repair what is damaged. The weakest point in the repair is usually your own tissue. The longer the history of damage and frequency of trauma prior to surgery, the more likely the tissue quality is poor. Other factors like Smoking and Diabetes may also reduce your tissue quality.

There are three areas where your rotator cuff repair may fail:

Bone-Anchor interface

  • The anchors today are very high in quality and usually do not fail; sometimes if your bone is soft (older patients), the anchor may pull out of the bone.

Anchor-Suture interface

This area is typically very strong and not a source of common failure

Suture-Tissue interface

This is the weakest point and the most common reason for failure of surgery (usually due to poor tissue quality)
There are special techniques in tissue management and suture choice to reduce failure rates.

The retear rate of the rotator cuff tendon repair ranges from 5-20% – the larger your tear, the more likely you are to have a retear of your repair. The failure rate after a biceps tenodesis is reported to be between 2-6%; however, in the Sydney Shoulder Unit experience, it is less than 1%.

The rotator cuff tendons are poor in blood supply and generally wear out over time. Tears can be partial thickness or full thickness. If you have a tear in your shoulder tendon then it will not heal by itself.

However, grey hairs and cuff tears do go hand in hand; not all patients with a torn rotator cuff need surgery. If the tendon tear occurs slowly over time then your shoulder will compensate and cope well by using the other tendons and muscles.

If you have an injury or a fall and sustain a large traumatic tear then you may lose shoulder function suddenly. In such cases it is best you consider surgery to reattach the torn tendon sooner.

In wear and tear cases, when the tear becomes very large, your shoulder function may deteriorate and you may need to see a shoulder surgeon. If you have left the tendon tear too long, the rotator cuff muscles may be replaced with fat and waste away; this may mean that reattachment is not possible.

Patient results

Rotator Cuff Repair + Biceps Tenodesis

This 48 year old gentleman works as a metal fabricator and presented with several months of new shoulder pain; he was finding it difficult to undertake overhead work and was limited with daily activity around the house.

MRI scans demonstrated a large rotator cuff tear with biceps tendonitis. Given the tear size and limitation in function – he proceeded with surgery.

He underwent keyhole shoulder surgery to re-anchor the biceps tendon (biceps tenodesis) and repair the rotator cuff (double row repair). An excellent repair was obtained with restoration of the anatomical footprint.

He commenced JPL rehabilitation at 2 weeks post-operatively; and an abduction sling was worn for six weeks in total. Strengthening commenced at 3 months post-surgery.

Rotator Cuff Tear

This 53 year old lady presented with right-sided shoulder pain after injuring her shoulder at work. She underwent a period of rest, cortisone injection and 3 months of physiotherapy without improvement.

After a careful history and examination, an MRI scan was undertaken. The MRI showed a Rotator Cuff Tear with Biceps Tendonitis.

The images taken at surgery (key-hole) demonstrate significant biceps tendonitis with inflammation and thickening of the tendon. The biceps tendon was taken out of the shoulder joint and re-anchored under the arm-pit (biceps tenodesis). The bursitis and bone spur was cleaned out and the rotator cuff tear was repaired with 4 anchors with good compression of the tendon foot-print.

She was discharged home the following day after surgery and placed in a sling for six weeks. She underwent JPL rehab which commenced at two weeks post-surgery. Strengthening commenced at months under the guidance of her physiotherapist.

She no longer has her previous shoulder pain and has good power of her rotator cuff.

Request a call back

Enquiries between 8am-6pm (Mon-Fri) will be responded to within 30-60 minutes.

"*" indicates required fields

Alternatively, if you have any further questions or would like a consultation with Dr Pant get in touch:

Medicare Card Help

1. Medicare Number
2. Position on card
3. Expiry Date

Request a call back